A Beginner's Guide to Lighting for OnlyFans Content
If your OnlyFans photos or videos look “fine” in real life but disappointing on screen, lighting is usually the reason. Good lighting makes cheap cameras loo...

If your OnlyFans photos or videos look “fine” in real life but disappointing on screen, lighting is usually the reason. Good lighting makes cheap cameras look better, reduces grain, improves skin tones, and helps your content feel intentional, not accidental.
The good news: you do not need a studio. Most creators can get a major quality jump with one window, one light, or one simple setup.
What “good lighting” actually changes (and why it affects sales)
Lighting is not just about being brighter. It controls how your content looks and how it feels.
- Sharpness and clarity: More light lets your camera use a lower ISO, which reduces noise and the “muddy” look.
- Skin texture and confidence: Soft light smooths harsh shadows and makes skin look cleaner without heavy filters.
- Mood and brand: Bright and airy reads “approachable” and “girl-next-door.” Darker, directional light reads “private” and “premium.”
- Consistency: When your lighting is consistent, your feed looks more professional, which improves trust and conversion.
If you are a beginner, your goal is simple: create soft, even light on the parts of the body you want to emphasize, while keeping the background clean and non-distracting.
The beginner lighting framework (3 questions that decide everything)
Before you buy anything or rearrange your room, answer these:
1) What are you shooting most?
- Photos (feed sets, teasers): You can optimize for one angle and one “perfect” moment.
- Video (PPV clips, customs, Reels): You need stable lighting that does not change mid-take.
- Live streams: You need flattering light that works for movement and multiple angles.
2) Where is your shoot happening?
- Near a window: Natural light can be your best free key light.
- At night or in a dark room: You need artificial light, or your camera will compensate with grain.
- Small space: Distance matters, the closer your light is, the softer it can look.
3) What vibe fits your brand?
- Soft and bright: Diffused front light, minimal shadows.
- Moody and cinematic: One key light from the side, controlled shadows.
- Anonymous/no-face: Backlight, silhouettes, or controlled shadow placement.
Once you know these, the setup becomes obvious.
Natural light: the fastest way to look expensive for free
Natural light is beginner-friendly because it is large, soft, and flattering when used correctly.
The easiest natural light setup (window at 45 degrees)
- Stand or sit facing the window, but turn your body slightly so the window hits you from about 45 degrees.
- Keep the camera on the darker side of the room, so the window is not directly behind you.
- Use a sheer curtain to soften harsh sunlight.
This creates soft facial and body shaping without deep shadow lines.
Fix the two most common window-light problems
Problem: You are backlit (window behind you), and you look dark.
Fix: Turn around. Put the window to your side or in front of you. If you must shoot with the window behind you, increase exposure on your face (tap your face on a phone camera), or add a small front light.
Problem: The light changes every minute (clouds), and your video looks inconsistent.
Fix: Shoot video at a consistent time, or switch to artificial lighting for anything longer than a quick clip.
A simple DIY “reflector” that helps a lot
If one side of your body looks too shadowed, bounce light back.
- A white wall works.
- A white foam board works.
- Even a white sheet can work in a pinch.
Place it opposite the window to lift shadows.
Artificial lighting basics (buy less, choose better)
Artificial lights give you control. They also add complexity, mainly because of color and harshness.
The only 4 concepts you need to know
Soft vs. hard light: Soft light wraps around you (more flattering). Hard light creates sharp shadows (more dramatic, often less forgiving).
Diffusion: Anything that spreads light (softbox, umbrella, shower curtain used safely, a white sheet with distance) makes light softer.
Color temperature: Warm light is more yellow, cool light is more blue. Mixed temperatures (warm lamp + cool LED) is what creates that strange, uneven skin tone look.
Distance: The closer a light is (without entering your frame), the softer and brighter it appears. If you move your light far away, it gets harsher and you need more power.
Practical tip: lock your phone camera’s exposure and white balance if your app allows it, so the image does not “pulse” brighter and darker mid-shot.
For a deeper, photography-focused explanation of soft vs. hard light and modifiers, B&H’s lighting tutorials are a solid free resource.
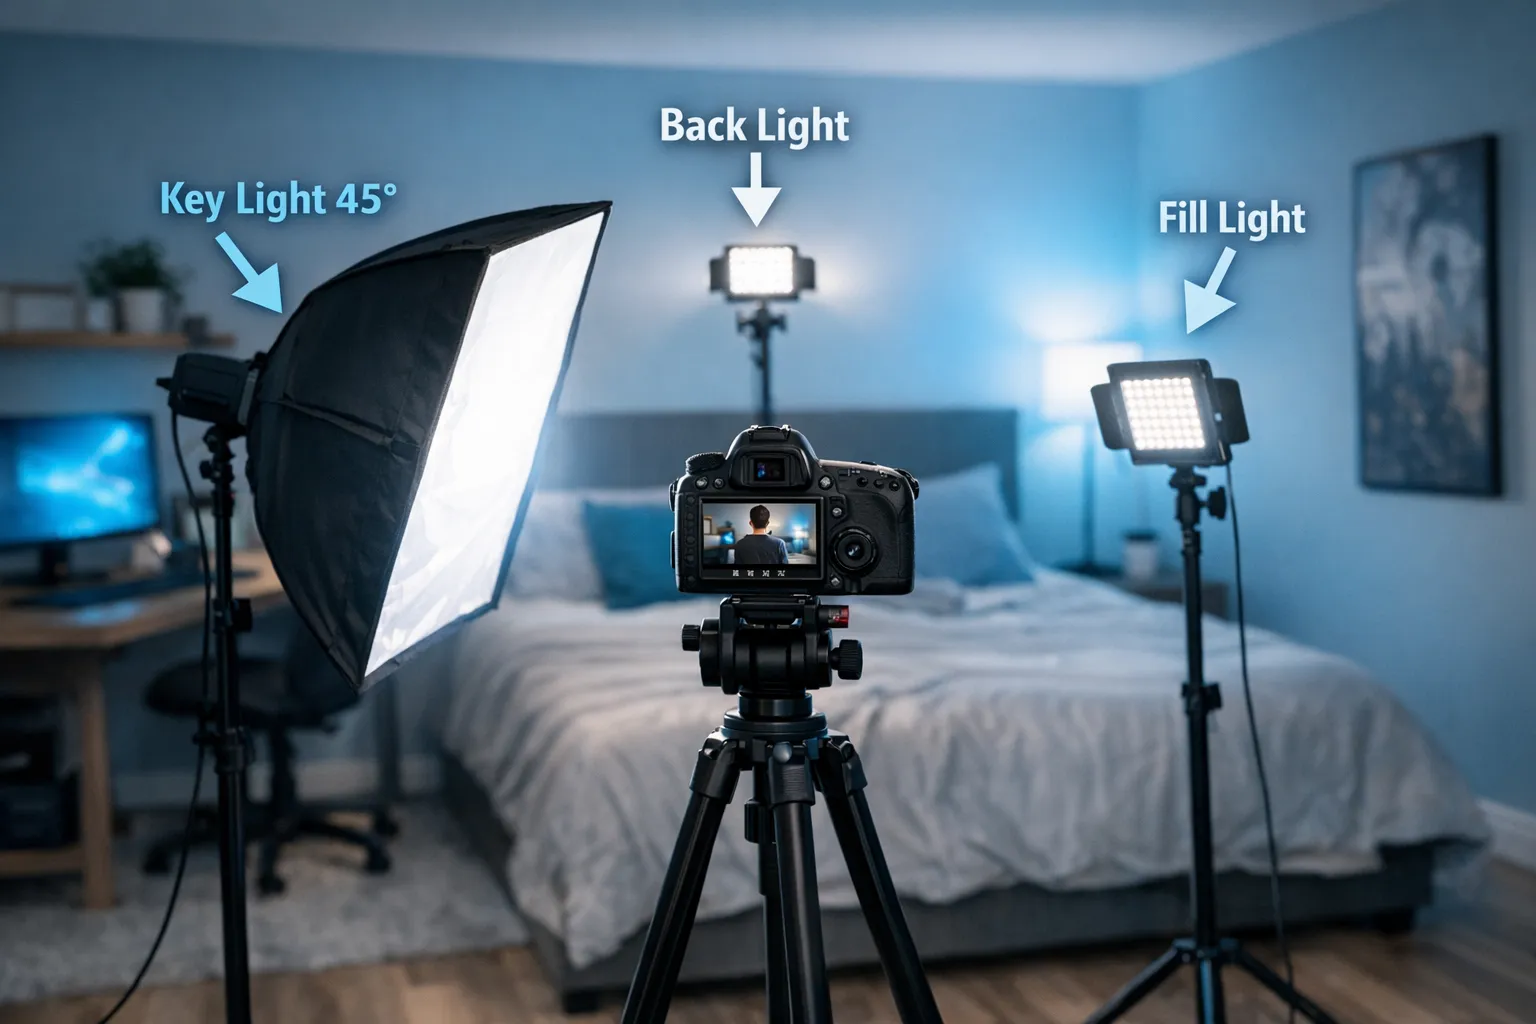
Beginner lighting setups (pick one and master it)
Here are practical setups that cover most creators’ needs. You do not need all of them.
| Setup | What you need | Best for | Pros | Watch-outs |
|---|---|---|---|---|
| Window light + reflector | Window, white wall/board | Photos, quick clips | Free, flattering, easy | Changes with weather and time |
| Ring light (front) | Ring light + stand | Talking clips, DMs promo videos, simple photos | Fast setup, even light | Can look flat, circular catchlights/reflections |
| One soft light (45 degrees) | Softbox or diffused LED | Most photos and video | Flattering, more “pro” depth | Needs a little space, requires positioning |
| Two-light setup | Key light + fill light | Full-body video, consistent content | Consistent, less shadow | More gear and more adjustment |
| Three-point lighting | Key + fill + back/hair light | Premium video feel, brand shoots | Best separation from background | More complexity, more stands |
If you want the simplest upgrade path: start with one good key light (soft and adjustable), then add a second light only when you feel limited.
How to light common OnlyFans content formats
Lighting should match the job.
1) Selfies and close-up shots (face, chest, upper body)
- Put the key light slightly above eye level to avoid unflattering under-chin shadows.
- Angle it slightly from the side (not straight-on) to add depth.
- If you use a ring light, do not crank brightness to maximum, step it back and soften it.
2) Full-body photos (standing sets)
Full-body is where beginners struggle, because one small light close to your face might not cover your legs.
- Move your key light a bit farther back so the spread covers more of you.
- Or use two lights, one aimed higher, one aimed lower.
- Keep the background darker than you (slightly) so you stand out.
3) POV or “camera-on-bed” angles
These angles often create harsh overhead shadows.
- Avoid ceiling lights.
- Place a soft key light off to the side, slightly above the bed line.
- If shadows get too deep, bounce light with a white wall or add a low-power fill.
4) Shower, steamy bathroom, mirror shots
Bathrooms are lighting traps: tiny rooms, shiny surfaces, mixed bulbs.
- Turn off overhead lights if they create harsh shadows.
- Use one consistent light source (your key light), then match other lights to its color.
- Check mirrors for reflections of your phone, your room, or personal items.
5) Live streaming
For live, prioritize “always flattering” over “cinematic.”
- Use a soft key light in front of you, slightly above eye level.
- Add a small backlight or lamp behind you to separate you from the background.
- Keep brightness stable, sudden changes look amateur on stream.
(If you plan to stream often, your lighting setup should be something you can reproduce in 2 minutes.)
Lighting for no-face and privacy-focused creators
Lighting can protect identity if you plan for it.
Safer lighting choices for anonymity
- Side light + shadow: Light one side of the face/body and keep the other in shadow.
- Backlight silhouette: Put a light behind you aimed at the background, exposing for the background so your face falls into shadow.
- Crop-friendly light: Light from the chest down and keep the face outside the brightest zone.
Privacy checklist (quick but important)
- Check reflections (mirrors, windows, glossy frames, TVs).
- Watch background clues (mail, unique art, street view through curtains).
- Be careful with distinctive jewelry or identifiable items.
For broader anonymity strategy beyond lighting, this guide may help: How to make money on OnlyFans without showing your face.
The most common beginner lighting mistakes (and the fixes)
Using ceiling lights as the main light
Ceiling lights create raccoon-eye shadows and emphasize texture.
Fix: Turn them off. Use a key light at face level, or window light.
Mixing warm and cool light sources
This is why skin looks greenish or uneven.
Fix: Choose one “main” color temperature. Turn off other lights or match them.
Putting the light too far away
Far lights get harsher and less flattering, plus your camera raises ISO.
Fix: Move the light closer, add diffusion, and lower brightness.
Overexposing skin
Blown highlights look cheap and remove detail.
Fix: Lower exposure slightly, then brighten shadows with fill or reflector.
Ring light reflection in eyes or mirrors
Not always bad, but it can look repetitive and it can reveal your setup.
Fix: Raise it slightly, dim it, or switch to a softbox style key light.
A simple pre-shoot lighting checklist (use this every time)
If you only take one thing from this article, make it this routine.
- Pick one main light source (window or key light) and commit to it.
- Turn off competing lights, especially overhead bulbs.
- Place the key light slightly above eye level, angled 30 to 45 degrees.
- Check your background for clutter and reflections.
- Do a 10-second test video, then watch it (do not trust the preview).
- Lock exposure/white balance if possible.
- Shoot 3 angles, compare, then run the full set.
When to upgrade your lighting (and what to buy next)
Upgrade when you notice one of these problems consistently:
- Your content looks grainy at night.
- Your full-body shots are unevenly lit.
- Your videos change color between clips.
- You cannot reproduce a look you liked.
A practical upgrade order:
- Better diffusion (softbox, umbrella, or a diffused LED) before adding more brightness.
- A second light (fill or background separation) once your key light is solid.
- Stands and positioning tools once you are tired of balancing lights on furniture.
If you are unsure what to buy, start by identifying what is limiting you: softness, coverage, or consistency. Buy to fix the limit, not because a creator on social media says it is “essential.”
If you want help building a content system (not just a setup)
Lighting is one lever, but it works best when it supports a bigger plan: what you post, how you upsell, and how you keep subscribers engaged.
If you want to focus on creating while a team handles growth, fan messaging, content planning, and protection (including content leak monitoring and DMCA takedowns), you can learn more about working with an OnlyFans management agency like Lookstars here: lookstarsagency.com.
No setup is magic, but a clean, repeatable lighting routine will make your content look more premium immediately, and it makes every other part of your strategy easier.

Ready to transform your career?
Join hundreds of creators already earning six figures with Lookstars Agency.
Share this article
Best OnlyFans Agency
Europe's Leading OnlyFans Management Agency.

100% Free Ebook
Get our guide and unlock the secrets to OnlyFans success.
100% Free Ebook
Get our guide and unlock the secrets to OnlyFans success.
Free Revenue Calculator & Profile Analyzer
Try them for freeContinue reading...
Am I Attractive Enough for an OnlyFans Agency? The Answer

Can You Ever Fully Delete Your OnlyFans Content? The Reality
